I just like food, ok?

I {heart} food, especially chocolate.  I like to push my love of food on my kiddos (well not really).

We measured candy bars with rulers.


In our 1st grade core, the students only need to know that rulers measure length.  They don't even have to know how to use the ruler. But of course, we expand upon that because it's good to expose them to it for their real world experiences. So if you teach 2nd, 3rd, etc....you could do this lesson, but be a little more strict on the measurements! :)

I am Rachelle, and I am addicted to {teaching} with FOOD. It's SO FUN! The kids are engaged and always give them a little taste of whatever food we worked with that day.

I didn't really care so much about the inches they wrote down because some of the candy was like 5 1/2 inches and that was for sure over their head (I just told them to write the number it was closest to. I just cared that they were working with their partner and not measuring backwards or upside down.


I had my kiddos travel around the classrooms in pairs, looking for a candy bar they'd like to measure {I had 2 of each candy bard and about 10 different kinds}.  They first talk about how many inches the bar might be (estimate), then they take turns measuring it, marking it on their paper, and recording the name of the bar and the inches.


{Click the picture below for the download}


Here is a Kinder/1st grade version you can use 
(with cubes and inches)! 


{Click the picture below for the download}


What do you'll do during your measurement unit?

Management Monday {Spring Edition}

I'm doing this in my classroom again this year and it works like a CHARM!

Are your kiddos feeling the spring fever or are you the one going stir crazy!?
This management tip is used on our 1st grade team but will work in any classroom. 
It's great for springtime spring fever.
You need 2 Easter baskets and plastic Easter eggs (you need double the amount of eggs as you have students...so if you have 25 students, you need 50 plastic Easter eggs).  Can anyone say Dollar Tree?

In basket #1, you fill the eggs with the students' names (one name in each egg).  In the other basket, you fill the eggs with strips of papers that have prize names on them.

Randomly throughout the day/week, pick a student to come and pick an egg out of the name basket.  They open up the egg and read the name {or you can pick from the basket instead of having a student do it-I just like to involve everyone}. If that student is on task they get to pick an egg from the prize basket (If they are not on task, you just quietly put the egg back and the students know that someone that was picked was not on task).  Here is a list of the prizes I giveaway. Some of them might not be applicable to you, but you can just leave those out.

{Click HERE to download the prize list}

After the winning student gets their prize, you also give them one of these certificates!  It makes them feel so good and you'll have VERY on task students all week.   

{Click HERE to download certificates}


clipart and or fonts from DJ Inkers (djinkers.com)

Hamburger Writing

This writing organizer helps the students when writing non-fiction.  A hamburger graphic organizer is a great way to structure non-fiction writing.  Just like a real hamburger, the more condiments and toppings {details}, the better the hamburger {writing}.  In writing, the more details the better the writing.

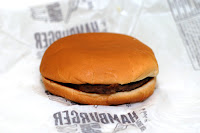
I introduce it by showing them a hamburger that looks like this {we then talk about what comes to mind when we see it}

 Then I show my students the nice, delicious-looking hamburger like this {We talk about what we think about it when we look at it}:

We make a list of items we need to make a delicious hamburger. 


Now for the writing part!  I tell them that our writing is like a hamburger. The more details we put, the more fun it is to read!  Today, we are just talking about a few parts of the hamburger to help us write non-fiction.  I show them this graphic organizer and we talk about the parts:


We make our own hamburger to remember all of the parts of our delicious writing. {Each student makes one. I pre-cut all of the pieces of construction paper and give each student a paper plate- they writing the key words on each part of the hamburger}

Then, I give the students their own graphic organizers to brainstorm items. On the graphic organizer they don't have to write sentences. They just write one word or phrase for each part of the hamburgers. We brainstorm some topics and then I set them free!


The next day, we turn those graphic organizer words into sentences.  I introduce it by doing a shared writing. We wrote about rainbows together. Then, I let them use their organizers from the day before and they wrote their own non-fiction story and illustrated it! 


When you are all finished, you can eat hamburgers! 
Buy the mini ones in the frozen section of the grocery store.


I linked up with Teaching Blog Addict!

Earth Day Mini-Unit {freebie}

Did you know that Earth Day is one month from today {April 22nd}?  In honor of Earth Day I've created a free mini-unit and our class is "going green" {your class can too! This is a multi-grade level unit}.   This unit is full of Earth Day topics such as reduce, reuse, recycle, pollution, mother earth, and more!


You will find activities for:
*Math
*Science
*Writing
*Centers
*Art
*Reading


Here are just a few of my favorite things...


This little guy is my favorite! 
This is a tin foil statue made from recycled foil!


Monday Management - Expectations


HAPPY MONDAY EVERYONE!!

The First Days of School: How to Be an Effective Teacher Have you ever read this book? It was our required textbook during my methods of classroom management class in college. I absolutely love this book and read it EVERY year before school starts.

 I love how this book illustrates how important the first couple hours/days/weeks are to a successful school year.


This past year, before I began the year, I created a Powerpoint with all my rules, expectations, procedures, etc. Then, I spent the first couple days of school going over the Powerpoint so my students knew exactly which behaviors I expected from them.

It was also very helpful to go over this Powerpoint after my students came back from Christmas break, and I also plan on going over it again after spring break.

If you'd like to view my Powerpoint,
 click here:

I know there's no way anyone could use my exact Powerpoint since we all have different rules, expectations, rewards, consequences, etc. But feel free to use whatever you can.

Here are some examples of the things I've included:
Just wondering... which rules/expectations/procedures/etc are most important to you?

*  *  *

IMPORTANT UPDATE:
After getting many requests for an editable version of this PowerPoint, I have recently created a new and improved (and EDITABLE) version of this resource. It is available in my TPT store by clicking here


For a fun way to motivate students to have good behavior, please check out these cute behavior incentive awards:

Winner, Winner!


You've just won a $100.00 gift card to The Container Store and we'll be contacting you shortly!


Thank you to everyone who entered!!!!  Ok, I know some of you are a bit bummed. But, did you know that The Container Store offers a %15 discount to teachers {in stores and online}?  Click {here} for more information!  And here is something to cheer you up... What the Teacher Wants always offers their tips, downloads, and resources for free.  Just remember...we {heart} you!

I spy... {time}

This is a game to practice telling time.  It can be used at ANY level because I have left the clocks blank for you to write in.  Copy the blank clock 12 times on cardstock and laminate. Write with a vis-a-vis (or sharpie if you want it to be permanent) the times you are working on along with a letter of the alphabet (A-J).


Put the clocks around the room and have your students walk around with a clipboard "spying" the analog clocks and writing the digital times on their recording sheet.  Easy, peasy, lemon, squeezey {mac and cheezy}!


Management Monday- Handwriting

I have a little sneaky motivator in my classroom that I use to help the students with their handwriting.  If I notice that they do a great job and they are really working on forming the letters correctly and taking their time, I will give one student a "Neat Treat"--Well, I actually don't give it to them, I leave it on their desk and the note says that it is from the Handwriting FairyThe Handwriting Fairy leaves the neat treat on their desk and they student finds it when they come to school the next day. And the crazy thing is...Mrs. Smith didn't even see a thing! They love getting a treat, especially when it's from a fairy! It's an automatic motivator!


I put the treat on their desk along with some "fairy dust".


Click {HERE} to download the "Neat Treat" labels!

What do you do to motivate your students to have good handwriting?


3D Leprechauns

There is the cute, artsy 3rd grade teacher at my school {Mrs. Coyle} who did these HILARIOUS {made me laugh out loud} 3D leprechauns. I just have to share:

Here is the how to:

Give the students a 12" circle pattern to trace on a 12X18 manila paper.
They cut into the center (vocabulary: radius), overlap until a nose appears.
"Leftover" manila paper is used for the ears. (Make sure they have points!)
Students can choose yellow, orange or brown (9X12) for the hair, etc.

                    Each gets: 9X12 green (for the hat)
                                      4X6 red (for the mouth)
                                      4X6 white (for the eyes)
                                      2X3 blue (for the eyes)
                                      3X3 yellow (for the buckle)


What do you think about these little darlings?
Related Posts Plugin for WordPress, Blogger...